

Kefir is a fermented milk drink originating in the north Caucasus Mountains and is a rich source of probiotics. Probiotic bacteria found in kefir products include Lactobacillus acidophilus, Bifidobacterium bifidum, Streptococcus thermophilus, Lactobacillus delbrueckii subsp. bulgaricus, Lactobacillus helveticus, Lactobacillus kefiranofaciens, Lactococcus lactis, and Leuconostoc species.
It has even been mentioned in the writings of Marco Polo of his travels among the Tartars:
“They drink mares milk, which they prepare in such a manner that it has the qualities and flavour of white wine. They term it in their language kemurs.”
Kefir is a popular drink in eastern and northern Europe and is now becoming popular across the world. It has a creamy texture with a slightly sour taste like thin yoghurt and is carbonated, making it an unusual drink.
Kefir milk is made with a gelatinous kefir grain, a yeast-bacterial fermentation starter and whole milk.
The health benefits of consuming kefir
Much research has been done that shows the health benefits of consuming kefir.
“Currently, several scientific studies have supported the health benefits of kefir, as reported historically as a probiotic drink with great potential in health promotion, as well as being a safe and inexpensive food, easily produced at home. Regular consumption of kefir has been associated with improved digestion and tolerance to lactose, antibacterial effect, hypocholesterolaemic effect, control of plasma glucose, anti-hypertensive effect, anti-inflammatory effect, antioxidant activity, anti-carcinogenic activity, anti-allergenic activity and healing effects”
(Source : Milk kefir: nutritional, microbiological and health benefits.
Rosa DD1, Dias MM1, Grześkowiak ŁM1, Reis SA1, Conceição LL1, Peluzio MD1.)
Further, studies have found that kefir milk can be useful in the treatment of diabetes. Information can be found at this link.
Another study found that consuming kefir improved lactose digestion and tolerance in adults with lactose malabsorption.
Preparation, equipment and requirements for culturing Kefir.
You will need a piece of milk kefir grain the size of a teaspoon and full cream milk in which to culture it.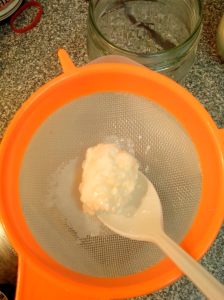

You will need:
- A plastic sieve of 110mm diameter is useful because it sits neatly into the half milk bottle mentioned below
- A plastic spoon
- 2 glass jars big enough to hold the quantity of milk you choose to make
- A pyrex or plastic jug (for those into sustainable methods a 2L plastic milk bottle cut in half can be useful. The bottom half is perfect for straining the kefir and is flexible enough for easy pouring of the kefir milk into bottles.)
- A glass bottle with lids to decant the kefir milk into that will be large enough to leave a 1/3 space between the kefir milk and the lid
- Cheese cloth for making kefir cheese if the kefir milk separates.
- One small thermometer
- An insulated portable cooler. The one in the picture is 10L capacity but anything you may have at home will do
- Two Ice Cooler Bricks to use alternately over the fermentation time in summer to keep the kefir at the optimal temperature
- A small notepad and pencil to write the time you started the fermentation to keep on top of the insulated cooler. As the saying goes: “The bluntest pencil is sharper than the sharpest mind!”

This plastic sieve is 110mm in diameter and sits perfectly into the cut off half 2L milk bottle ready for straining the kefir Important Notes:
- Always use glass bottles and jars and plastic utensils like spoons and strainers.
- Use whole cow or goats milk NOT UHT, Lite or soy or other milk
- Always use dry, clean, glass jars.
- Wash jars and bottles well with hot soapy water making sure to rinse and dry thoroughly. If you want to quickly rinse a jar for use, wash it out with some distilled water.
- NEVER use antibacterial soaps as it will damage the bacteria in the kefir grains.
- Rinse and dry the jars really well, making sure there is no soap residue.
- If you should drop your kefir grain rinse it briefly with distilled water not ordinary tap water
The importance of temperature in culturing Milk Kefir:
Temperature is critical to making kefir milk. The optimal temperature range is between 18 – 22 C. Lower than 18 and the kefir will take longer to ferment and over 22 it will ferment more quickly. Generally then, kefir ferments more slowly in winter and will need to be kept warm, while it ferments faster in summer and need to be kept cool.
Place the jar with the kefir grain and milk and the bottle of strained kefir milk in a portable insulated cooler like an esky cooler with a thermometer. Add a reusable gel ice brick in summertime. This keeps the temperature more even and prevents the kefir consuming all the lactose and then separating into curds and whey.
By monitoring the temperature from time to time and replacing the ice brick accordingly it will be much easier to complete the kefir cycle and harvest the kefir milk.
Making your Kefir Milk:
To begin:
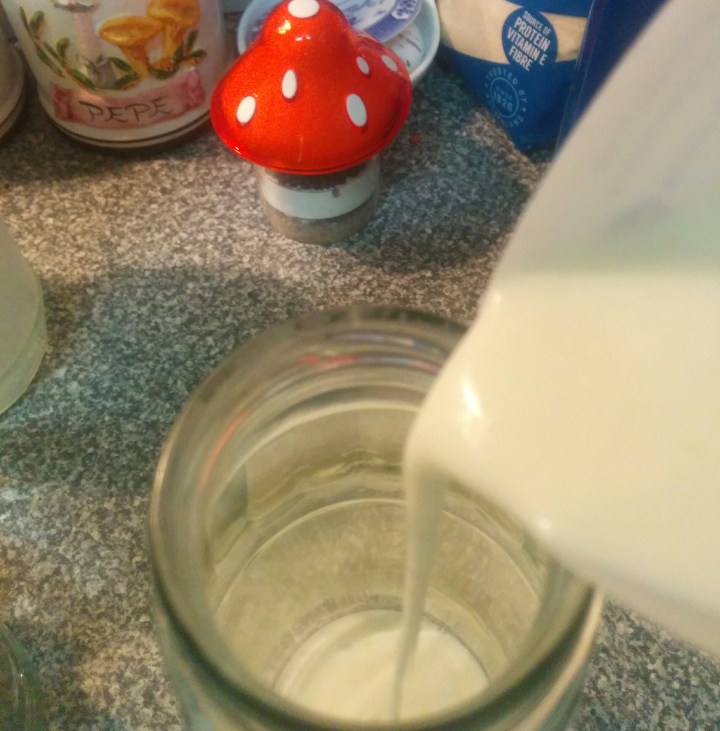
Place your Kefir grain in a clean, dry, jar and fill with milk, making sure the jar is big enough to have at least a 2.5 cm space between the milk and the lid.
A good ratio is 10 parts milk to 1 part kefir by weight eg: 25g Kefir to 250 mls milk, or simply 1 teaspoon kefir to 1 cup of milk.
Then……..
In summer:
- Place the kefir grain (in the jar with the milk) into the portable insulated cooler or esky. Cover the jar with the lid loosely over it or with some cheese cloth to cover.
- Place a cold gel ice brick into the portable cooler, but not touching the kefir jar and close the cooler, leaving it for 18 hours.
- Also place your thermometer into the cooler so that you can check the temperature from time to time (and replace the ice brick if needed) to keep the temperature in the optimal range of 18 – 22º C . Adding the ice brick will lower the temperature below 18 initially
- Record the time you placed the kefir into the cooler on a small notepad that you keep with the cooler. It is amazing how easy it is to forget the time you started and keeping a note makes tracking so much easier.
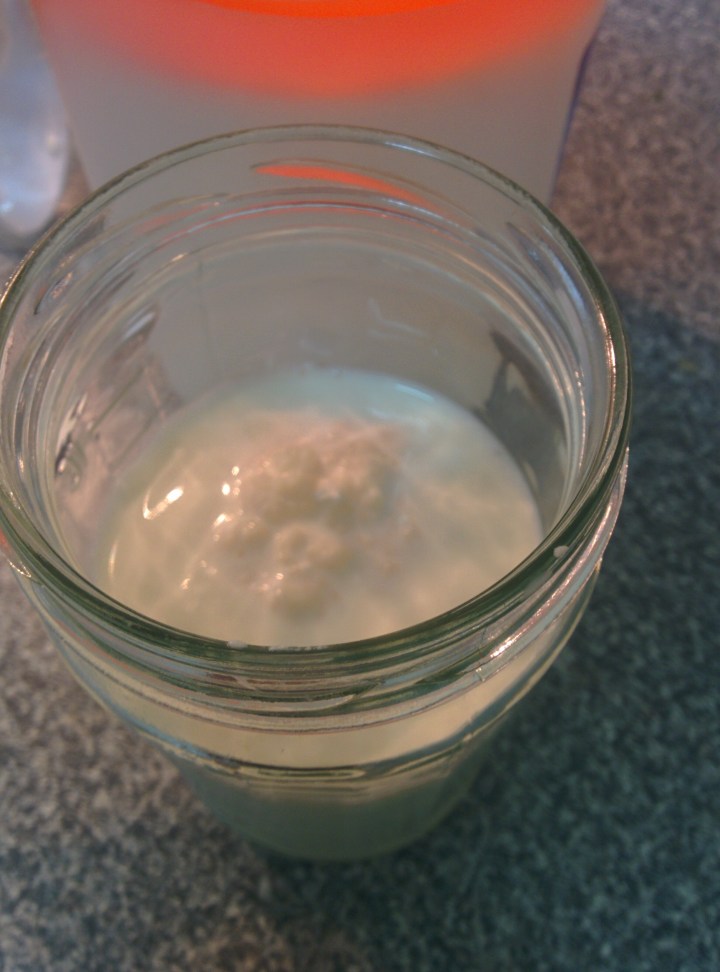
- After the 18 hours, the kefir should be ready. You will see small dimples or holes in the milk that will indicate it is ready.(see the image below under heading ‘when the Kefir is ready’ )
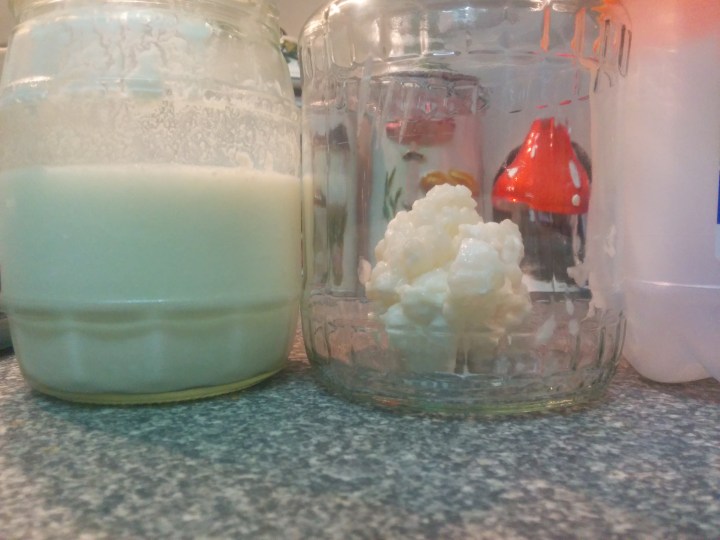
- Strain the milk into another container, gently stirring to help the milk disperse into the container.
- Remove the kefir grain using a plastic spoon
- Place the kefir grain into a new clean jar.
- Add fresh milk at a 10 to 1 ratio (eg 25 g kefir to 250 g milk) to the kefir grain.
Pour the strained kefir milk into a clean glass bottle making sure to fill only 2/3 of the bottle. It is important to leave this space as the kefir fermentation creates a build up of carbon dioxide and may create some pressure in the bottle.

- Seal the bottle tightly with a lid.
- Place the kefir grain and milk in jar (loosely covered) and the bottle of sealed, strained kefir milk ( which we will be leaving out for further fermentation) into the portable cooler, esky with the cold ice brick and thermometer. Write down the time you start the fermentation of the kefir grain.
- Leave for a further 6 hours to complete the cycle
- After the 6 hours, refrigerate the bottle of sealed Kefir and continue the fermentaion of the kefir in jar till it is ready.
- Repeat the process again by straining the kefir grain
In winter:
- Place the kefir grain in the jar with milk and leave for 24-48 hours in the portable cooler or esky. No ice bricks are used as the portable cooler will insulate and keep the kefir warm
- After the 24 -48 hours the kefir will be ready. You will see small dimples or holes in the milk that will indicate it is ready.
- After the 24 -48 hours, strain the milk into another container, gently stirring to help the milk disperse into the container.
- Remove the kefir grain using a plastic spoon.
- Place the kefir into a new clean jar.
- Add milk at a 10 to 1 ratio (eg 5 g kefir to 50 g milk) to the kefir grain.
- Pour the strained kefir milk into a clean bottle making sure to fill only 2/3 of the bottle. It is important to leave this space as the kefir fermentation creates a build up of carbon dioxide and may create some pressure in the bottle.
- Seal the bottle with a lid.
- Place the jar and the bottle of sealed, strained kefir milk ( which we will be leaving out for further fermentation)in the portable cooler, esky.
- Leave for a further 6 hours to complete the fermentation then refrigerate the bottle of sealed Kefir.
- Repeat the process again by straining the kefir
Repeat this every 18 hours in summer and every 24- 36 hours or even longer in winter. Refrigerate the bottle of the strained kefir milk after the further 6 hours fermentation at room temperature.
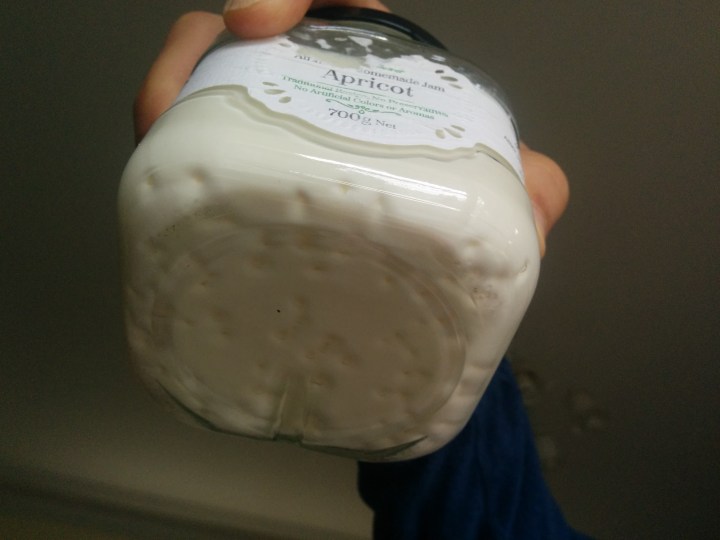
What the kefir will look like when it is ready:
After the full fermentation you will notice small dimples at the bottom of the jar and small bubbles on top as shown in the images below. The milk will be thick and ready to harvest.


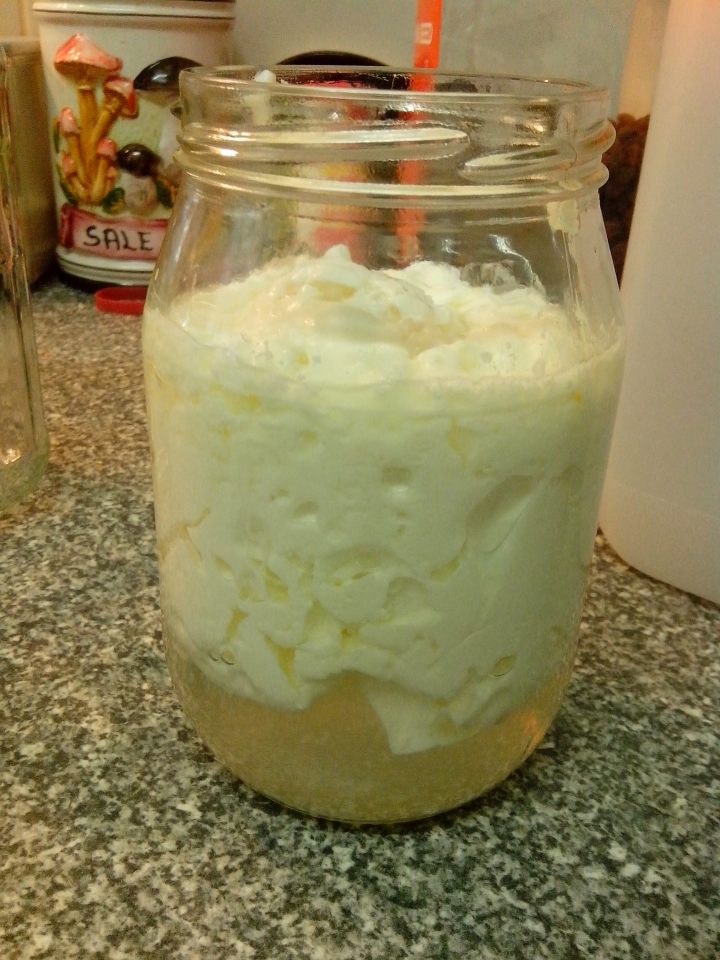
If the mixture separates into curds and whey, don’t panic…..
……just make kefir cheese:
- If you are late in harvesting the kefir milk and you see that there is about a cm of whey at the bottom, leave it for a few more hours until you have about 2-3 cm of whey.
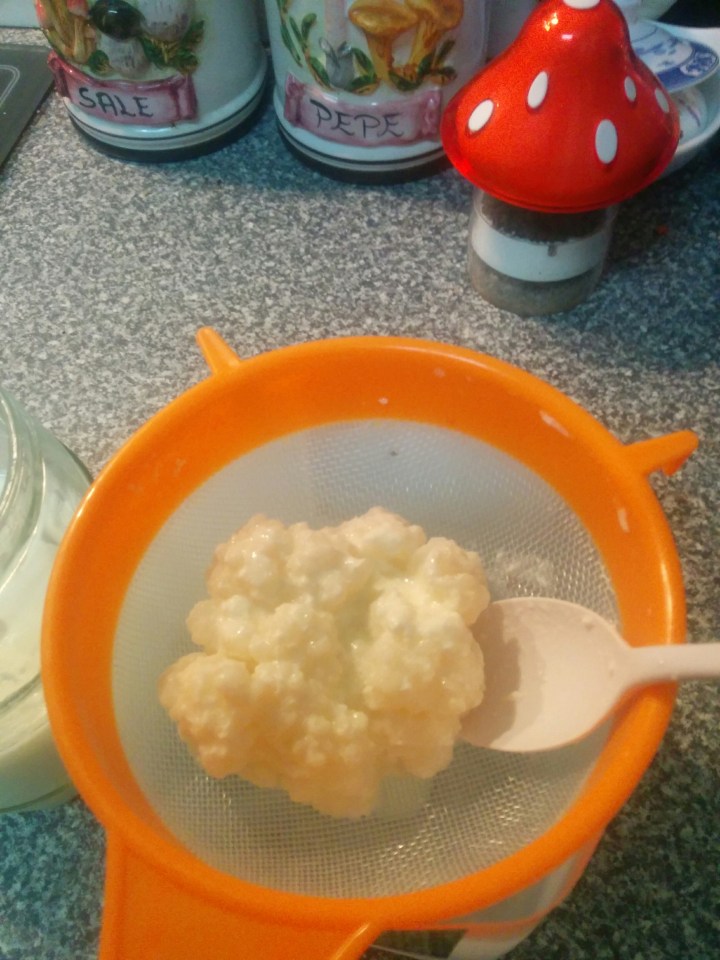
- Take out the kefir grain carefully from the thick creamy cheese with the plastic spoon.
- place the grain in the seive and shake it carefully to remove excess cheese from the grain and place the grain in a clean jar adding enough milk for the weight of the grain.
- Line the seive with a cheesecloth.
- Tip the contents of the jar into the lined seive and let it drain into the jug.
- Pick up the four corners of the cheesecloth together and tie with a string.
- Hang the cheescloth from a wooden spoon etc that is suspended over the jug.
- Leave for 10 hours in the fridge to drain.
- The next day spoon the cheese into a clean jar and seal.
- It will keep in the refrigerator for up to a week.
- Spoon the delicious creamy cheese onto your favourite sourdough bread or toast and top with a luscious jam for breakfast.
Adding flavouring to Kefir Milk:
You can flavour your kefir milk by adding bluberries to the kefir bottle for the second 6 hour fermentation. It will flavour the milk and add a zing to the blueberries too.
You can also use other berries of pieces of thinly sliced orange, mandarine or lemon peel to the last fermentation.
Cooking with Kefir milk:
You can use the Kefir milk in the place of buttermilk or sour cream in your favourite recipes. It can be used as a starter to make sourdough bread and is used in cold borsct soup.
Pour kefir milk over your favourite cereal or muesli for breakfast or as a smoothie or milkshake .
Make kefir milk pancakes by replacing the whole milk with Kefir Milk. Here is a link to the recipe for the pikelets below:

